Creating projects with the SDK
Sometimes, instead of keeping a set of example projects in a GitHub repository, it is more convenient to create them dynamically on the fly. This is often the case when you maintain a documentation with code snippets that you want your users to open in a live environment.
In order to create a project on-demand, use our SDK. It is a small package (just 2kb gzipped) intended to help in communication between your code and StackBlitz.
This page will guide you through the SDK setup and available options. You can also take a look at the demo project at the end of this page.
Setup
To add the StackBlitz SDK to your project, run npm install @stackblitz/sdk in the terminal or add this script to your page:
<script
  src="https://unpkg.com/@stackblitz/sdk/bundles/sdk.umd.js">
</script>
This will give you the access to the global StackBlitzSDK JavaScript object, which you can use to create projects and even send additional commands to the environment, for example to update it or change the active file.
Creating a new project
To create a new project and open it in the same (or different) tab, you will use the openProject method, which accepts two arguments:
- a payload object,
- an options object (optional).
For example, here is a new project that will render a “Hello World” header and then run an alert. If you want to see it yourself, click the following button:
StackBlitzSDK.openProject(
  // Payload
  {
    files: {
      'index.html': `<h1>Hello world!</h1>`,
      'index.js': `alert('Woohoo! We can start documenting!')`,
    },
    template: 'javascript',
    title: `My First Docs!`,
    description: `This is an example of my first doc!`,
  },

  // Options
  {
    newWindow: true
  }
);
Payload: the contents and crucial settings
Let’s take a look at some of the most crucial parts of the payload first.
{
  files: {
    `file1Path`: `file1Content`,
    `file2Path`: `file2Content`,
    /* ... */
  },
  template: `projectTemplateName`;
  /* ... the rest of the payload ... */
}
Files
files is a flat JavaScript object where each key represents a path, and each value is the file's contents. For example: in order to create a project with a readme.md file and src folder that contains an index.js file inside, your files would look something like this:
{
  files: {
    `readme.md`: `# Welcome to the demo`,
    `src/index.js`: `console.log('Hello, demo!')`
  }
}
For a more extensive example see this Gist.
Template
template defines a way StackBlitz environment will build the project. There are two options to choose from:
- a preconfigured custom setup dedicated to specific technology such as
angular-cliorcreate-react-app, node, a WebContainers environment where you decide how your app example will be built, for instance with Vite or webpack.
You can find the full list of available templates here.
{
  template: 'javascript'
}
Dependencies
dependencies allow you to specify the list of the libraries your project needs similarly to how they are listed in the package.json file. Here is an example dependencies entry:
{
  dependencies: {
    lodash: "3.8",
    react: "17"
  }
}
Title and Description
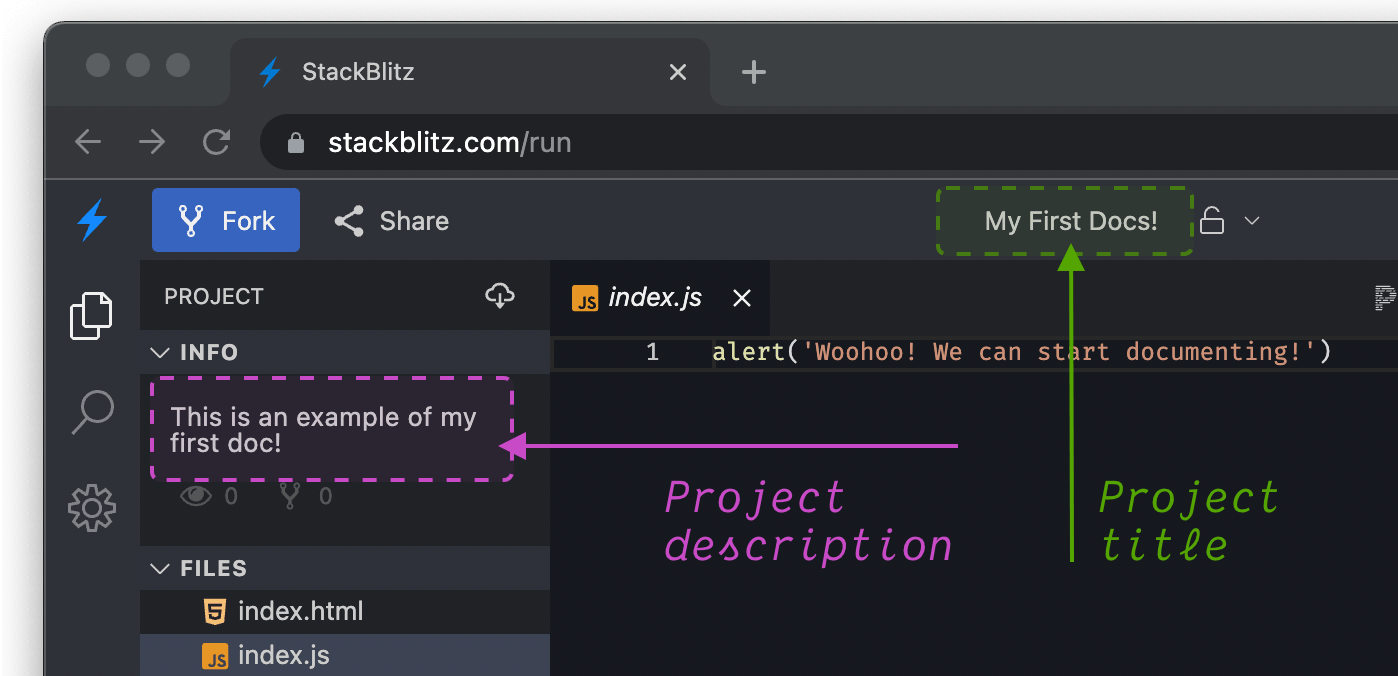
Now that you have the content of your project defined, it is useful to provide some explanation for your users to see when the environment opens. That's where the title and description properties come in handy:
{
  title: `My First Docs!`,
  description: `This is an example of my first doc!`
}
This is how the title and description look inside a StackBlitz project:
Options: Customizing your project
To further customize your project, you can provide a second argument to the StackBlitzSDK.openProject method. The argument is an object that allows you to provide optional adjustments:
openFile– StackBlitz displays a file in the editor on page load - depending on the project, that would usually be a readme or the index file. You can specify the featured file:js{ openFile: 'src/app/index.tsx' }newWindow– By default, the project will be opened in a new browser window. To open in the same one, set this parameter tofalse:js{ newWindow: false }hideDevTools– Projects that are not powered by WebContainers feature a small console located next to the editor you can use to log things for your users without them needing to open the browser's DevTools. To hide it, sethideDevtoolstotrue:js{ hideDevTools: true }devToolsHeight- the console in the preview window is set to take 33% of the window's height (in the projects not powered by WebContainers). You can change its height:js{ devToolsHeight: 50 }initialPath– Set the path to be opened by the preview window:js{ initialPath: '/posts' }origin– If you are using StackBlitz Enterprise Edition on-premise, this setting will allow you to set the origin URL of your StackBlitz EE server:js{ origin: 'https://our-sb-instance.internal.excellent-company.com' }
Demo
DEMO
Check this demo of creating a project with StackBlitz SDK through an npm install:
or through loading the UMD bundle.
Can we improve this guide?
Haven't found an answer to your question? Let us know!