Integrating CodeflowApp Bot
This page covers integrating CodeflowApp Bot into your GitHub repositories.
What is CodeflowApp Bot?
CodeflowApp is a friendly bot, which provides a one-click link that spins up the whole environment for pull requests and issues. No more context-switching or branch-checkouts, just a new browser tab with a full IDE and a dev server running.
Pull requests
Once integrated, it will comment on every PR with a link to instantly run and review it:

Issues
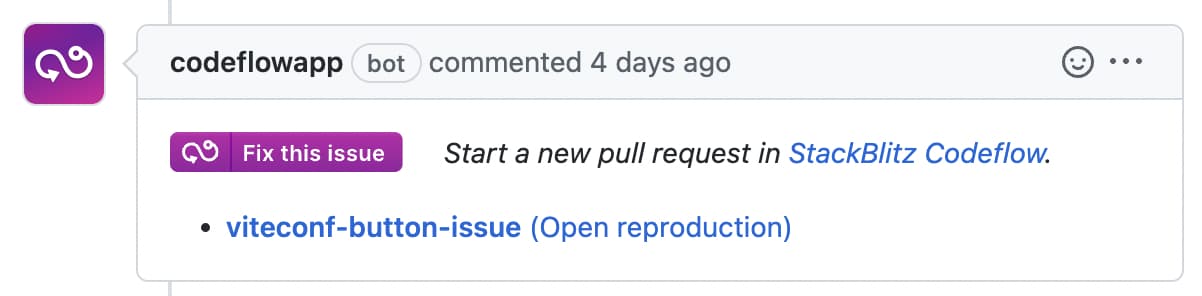
Whenever an issue is opened, CodeflowApp checks if a stackblitz.com bug reproduction URL is present in the comment text.
If reproduction URL is present, CodeflowApp will comment with a "Fix this issue" button that allows you to start a new pull request with the bug reproduction mounted in a sibling folder next to your repository directory for live testing:
Installing the CodeflowApp Bot
To install the CodeflowApp bot on a repository, you will install it using GitHub UI.
- Visit CodeflowApp profile page
- Select the account or organization, as well as the repositories you want the bot to have access to.
- If you choose “all in Organization”, CodeflowApp bot will be installed on all repositories in your organization.
- Please don't worry - if you change your mind, you can change the bot access or completely disable it!
TIP
Installing CodeflowApp ensures every commit to default branch and any pull request branches are pre-cloned for instant bootup times. Your project will run faster on Codeflow.
Disabling CodeflowApp Bot
Once installed, the bot will be enabled by default on the repository and will be triggered whenever there is a new PR or an issue.
To disable the bot:
- Create
.stackblitzfolder in the root directory of the project. - Inside this folder, create a file called
codeflow.json, specifying which actions you want disabled:
// .stackblitz/codeflow.json

{
    "bot": {
        "issues": {
            "enabled": false
        },
        "pullRequests": {
            "enabled": false
        }
    }
}
Alternatively, you can also pause or uninstall the bot through the GitHub UI.
Enabling package overrides for issue reproductions
Codeflow allows users to specify which packages they want to override in package.json and where the packages are located. A pnpm override is what is going to be installed when you run pnpm i instead of what is defined in a package.json file.
pnpm override
A pnpm override "instructs pnpm to override a dependency in the dependency graph. This is useful to enforce all your packages to use a single version of a dependency, backport a fix, or replace a dependency with a fork."
pnpm override use case scenario
For example, an issue is submitted to Vite with a StackBlitz reproduction.
- A maintainer opens the issue in Codeflow IDE. Codeflow IDE pulls the reproduction that is defined in the issue, puts it in a reproduction folder, and reads the
codeflow.jsonfile. - If that file defines an override, Codeflow adds them to the repro’s
package.jsonfile. So, for example, instead of pulling Vite from npm, it will link the local vite project into that reproduction instead. - The maintainer can then run
pnpm iin the repro and pnpm will install the dependencies defined in the override.
TL;DR
Using pnpm override, you can fix a bug and immediately try it out in the reproduction the user provided.
Enabling pnpm overrides
To set up pnpm overrides, follow these steps:
- In the project's root directory, create
.stackblitzdirectory. - Inside it, create a file called
codeflow.json. - In the file, specify the overrides by providing a key-vaue pair of the dependency to override and the folder where it is located. Please note that the location is relative to the root of the project.
// .stackblitz/codeflow.json

{
    "pnpm": {
        "overrides": {
            "vite": "./packages/vite"
        }
    }
}